Creating a stopwatch in Pinetime
The Pinetime is a free (as in freedom) and open-source smartwatch that is a completely community-driven side-project. Enthusiasts all around the world are writing multiple firmware for the watch. Currently, Infinitime is one of the most popular firmware for the Pinetime1 project and the latest watches shipped use it as the default firmware. I also like this project because I get to use Modern C++ on a tiny nrf52 microcontroller that is onboard in Pinetime.
Recently I created a Pull Request for a stopwatch and it got merged upstream. So in this short article, I am going to cover the basics of the “framework” for writing applications (Apps) in Infinitime, and how I designed a basic stopwatch.
Apps Interface:
There is no/minimal documentation as to what to do to write an app in Infinitime. So I decided to see how other apps are implemented and just use the power of grep to figure out.
Overall the author and the community have done a great job in creating a well abstracted, event-driven code base to develop apps.
So all the Apps in Infinitime inherits from the base class Screen. These are the functions that must/shall be implemented in our App class that inherits from Screen (added comments in the code for clarity):
// This function is called every 20 ticks (approx to 20 ms).
// The part that needs to be updated continuously should be inside this function.
// This function needs to be implemented by the App (as it is a pure virtual function)
// The return value should be true if this App needs to continue to run.
virtual bool Refresh() = 0;

// Pinetime has a button that is typically used to wake up the watch.
// This function will implement the code in the event of a button push
// and it is optional to implement.
virtual bool OnbuttonPushed();

// The two functions below are triggered for touchevents
virtual bool OnTouchEvent(TouchEvents event);
virtual bool OnTouchEvent(uint16_t x, uint16_t y);
Of course, there are more things apart from implementing the Screen interface to get the application to work. The best way to figure that out right now is to do a grep of some application class that has already been implemented and replicate it for your application.
Stopwatch
Now that we know the basic framework on how to develop an app in Infinitime, let’s start chalking out the logic of a stopwatch before jumping into the implementation.
Logic
As we want the stopwatch to be event-driven, the easiest way to describe its logic is via a good old state machine/diagram as shown below:
 |
|---|
| State diagram for a stopwatch |
(If you understood the logic of the state machine by just looking at the diagram, then skip ahead to the next subsection: Implementation)
The INIT state has everything reset and the only event possible from the INIT state is to press play (event).
Once play is pressed, the state transitions to a RUNNING state. There are two possible events in the RUNNING state: press lap or press pause. If the press lap event is triggered, the current elapsed time should be displayed (aka as split) and the clock should keep on running. If the press pause event is triggered, the state transitions to the HALTED state.
In the HALTED state, the stop clock timer is paused and information already displayed on the watch should stay as is. There are two possible events in the HALTED state: press play or press stop. The press play event should restart the stop clock from where it got paused, and the press stop should reset the stop clock and transition to the INIT state.
Implementation
The two important things to figure out for the implementation is how to display something on the watch, and how to calculate the time elapsed while the stop clock is running. So Infinitime uses LVGL to create graphics on the watch display and FreeRTOS as the real-time operating system (which could also be used to retrieve the time elapsed).
Time elapsed:
FreeRTOS provides a convenience function xTaskGetTickCount() to get current tick count. Ticks are some sort of a scaled unit of time that is used by the FreeRTOS. Now that there is a way to get the current time in ticks, the time elapsed can be easily calculated.
Whenever the user triggers the play event, the xTaskGetTickCount() function is called to store the start time in ticks. So each time the Refresh() event is called by the Infinitime framework, the xTaskGetTickCount() can be called again to find the difference between the start time to get the time elapsed. Very easy…., except the story doesn’t end there.
In microcontrollers, the time can be measured by different timers present in the system which pulses at a certain frequency. The RTC (real time counter) that FreeRTOS uses in the Infinitime is the RTC1 which has a frequency of 32,768 kHz. The counter just keeps increasing for each tick and FreeRTOS stores this counter in a 32-bit value2. Whenever the counter reaches a value of 4,294,967,295 (232 - 1), it resets backs to zero. So this is generally called an overflow in the counter.
The counter flow can lead to erroneous calculation in time elapsed. For e.g., assume our start time tick is equal to 4,294,967,291 (232 - 4) and next tick we receive in the Refresh function is 5 due to an overflow in the counter. Even though the actual time elapsed is 10 ticks: 4 ticks until overflow + 6 ticks after overflow (0 is also a tick), but when the difference is directly calculated, it turns out to be 4,294,967,286 (4,294,967,291 - 5)ticks. That is completely wrong and will introduce an error in the calculation of the stopwatch.
To avoid the error with counter overflow, a simple check could be done as follows:
TickType_t delta = 0;
 // Take care of overflow
 if (startTime > currentTime) {
   // Could be done in one line but made it separate for
   // clarity
   delta = 0xffffffff - startTime;
   delta += (currentTime + 1);
 } else {
   delta = currentTime - startTime;
 }
This simple check verifies if the startTime is greater than the currentTime (when we find a time machine this would not be valid anymore :P ) and calculates the delta appropriately.
Even though the above solution works in case of a timer overflow, I found an another neat solution which could do the same calculation in one line without any if/else condition3:
TickType_t delta = 0;
delta = (currentTime - startTime) & MAX_COUNTER_VALUE; // MAX_COUNTER_VALUE in our case is 0xFFFFFFFF(2^32 - 1)
I am not going to explain why the above solution works because it is deviating from the original intent of the article. But here is a small hint for the curious ones: this solution works because of the magic of the 2s complement. In case if some of you forgot how twos complement is used to store negative numbers, I highly recommend watching this amazing video from Ben Eater.
Display & State transitions:
As I already mentioned, Pinetime uses the LVGL library to display, create buttons, etc on Pinetime. It is a very popular graphics library used in many embedded platforms.
Label text and buttons widget are all that are needed to implement the stopwatch. The label text widget is used to display the time elapsed, laps, etc. The button widget will be used to start, pause and stop the stopwatch. Pressing the appropriate button will create the event in the state machine. LVGL’s button widget will take a callback and it will be invoked when the button press takes place.
As LVGL is a C library, the callback is a function pointer instead of a C++ std::function. As I wanted to pass the current object of the class StopWatch into the callback, I had to use a simple static dispatcher function. It was done as follows:
static void play_pause_event_handler(lv_obj_t* obj, lv_event_t event) {
  auto stopWatch = static_cast<StopWatch*>(obj->user_data);
  stopWatch->playPauseBtnEventHandler(event);
}
The play_pause_event_handler is the callback for the play/pause button. As LVGL allows to pass some user-defined data as a part of the callback, this pointer of the object was used there (obj->user_data). Using the this pointer, a private member function of the class StopWatch is called in-turn which also has access to all the class private variables.
These button’s callback serve an important purpose to through which we can indicate an event to the state machine. For example:
void StopWatch::playPauseBtnEventHandler(lv_event_t event) {
  if (event == LV_EVENT_CLICKED) {
    if (currentState == States::Init) {
      currentEvent = Events::Play;
    } else {
      // Simple Toggle for play/pause
      currentEvent = (currentEvent == Events::Play ? Events::Pause : Events::Play);
    }
  }
}

bool StopWatch::Refresh() {
  switch (currentState) {
    // Init state when an user first opens the app
    // and when a stop/reset button is pressed
    case States::Init: {
     .....
     ....

      if (currentEvent == Events::Play) {
		....
        currentState = States::Running;
      }
      break;
    }
   case States::Running: {
		....
   }
  ....
}
Let’s assume the currentState shown in the above snippet is set to State::Init. Whenever the play/pause button is pressed, StopWatch::playPauseBtnEventHandler is invoked. In that callback function, the currentEvent is set Events::Play. As the Refresh function is called every 20ms, in the next cycle we change the currentState to States::Running (check also the state diagram shown before), therefore, successfully making a state transition.
As play & pause are mutually independent and stop & lap are mutually independent only two buttons were used in total.
Lap/Split:
The final feature to implement is the lap (aka as split) feature. As the space in the watch is limited, we can only display the latest two splits. A simple circular buffer was used to hold the latest two splits and display them on the watch.
The callback for the lap button was as follows:
void StopWatch::stopLapBtnEventHandler(lv_event_t event) {
  if (event == LV_EVENT_CLICKED) {
    // If running, then this button is used to save laps
    if (currentState == States::Running) {
      lapBuffer.addLaps(currentTimeSeparated);
      lapNr++;
      lapPressed = true;
     .....
Whenever a lap button is pressed in the States::Running, the currentTime is added to the buffer and a boolean lapPressed is set to true. The Refresh function will check for any available data in the buffer and display it in the appropriate location.
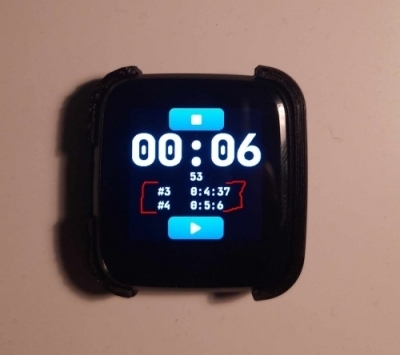 |
|---|
| Splits highlighted in the stopwatch app |
Final result:
The final PR that got merged can be viewed here in case if someone wants to see the complete code.
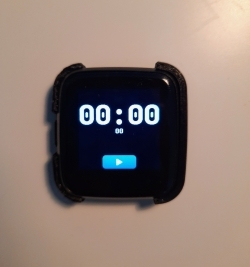 |
|---|
| Init state: Only play button available |
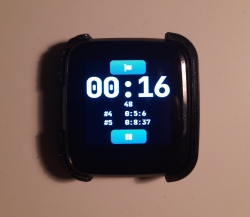 |
 |
|---|---|
| Running state: Only pause or split button available | Halted state: Only stop or play button available |
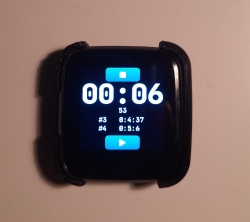
 |
|---|
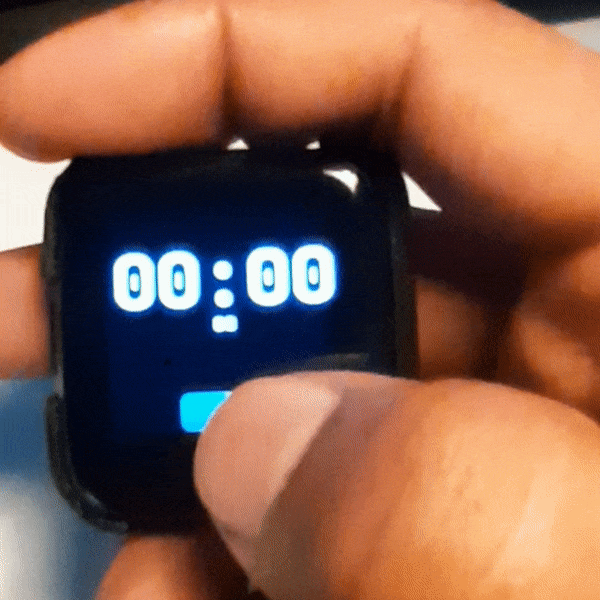
| Stopwatch in action |
Conclusion
Writing an app for Pinetime watch in a watch firmware like Infinitime was not as difficult as I thought it would be. All I needed was the logic and some embedded software knowledge to implement a stopwatch. The main credit goes to the author and the community that has done the leg work of setting up everything: from toolchains to libraries.
I believe the Pinetime watch provides a perfect playground if you are an embedded software enthusiast or someone with software knowledge but wants to dig deep into the embedded side of things. There is an active community from all over the world who are always willing to help. And all the firmware that is currently available for Pinetime is far from done. I believe everyone can contribute to them in some way and make this community-driven project a success.
Now, what are you waiting for? Get a Pinetime and start hacking! :)
Hope you enjoyed the article. Happy coding!
1 Other firmwares that I know are wasp-OS, Pinetime Lite (A fork of Infinitime), pinetime-rust for all the rust lovers.
2 The inbuilt RTC1 of the board only has a 24 bit counter but the FreeRTOS wrapper has a 32-bit wrapper on top of it.
3 I found this neat trick in FreeRTOS’s overflow protection difference calculation here